Setting up a Laravel application is essentially the same as any other website, like WordPress. It consists of files and a database (if it uses one). The only drawback of a Laravel application could be its add-ons if they require more permissions than shared hosting (cPanel) can provide. However, in most cases, this is not a problem because the Laravel team realized that more and more people use Laravel on shared hosting, so they have replaced the requirements since version 5, and it no longer requires any PHP functions that are usually blocked.
You can follow this guide if you are transferring a Laravel application from one hosting to another or from your computer to hosting. The transfer process is the same regardless of where the files are located.
For this example, I used a Laravel application where I installed the invoice package to see how it works. I will use the same application for this tutorial.
- The first step is to select all the files of our application and ZIP them (it is essential to use .zip format). You can also transfer the files by uploading them via FTP, but for this example, we will use .zip as it is the most common practice among our clients.
Find all the files, select them, and then zip them using a program, or if you are on Windows 10, use the option shown in the image below.

Now that we have zipped our application, we need to transfer it to cPanel.
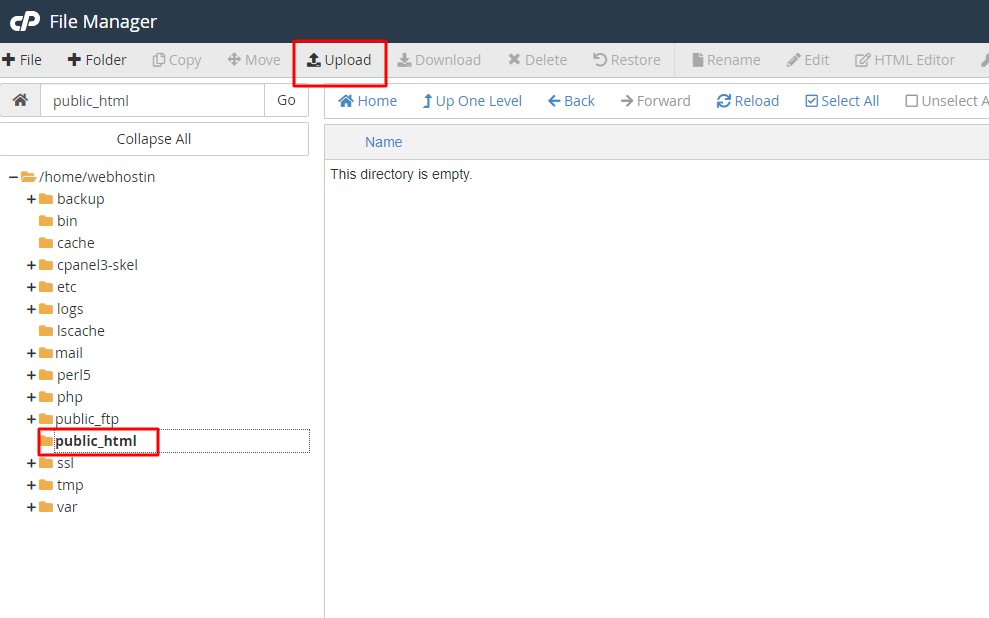
- Open cPanel and go to the File Manager option. Then click on the public_html folder on the left side to open it, and then click on Upload.

In the upload window, find the ZIP file that we created by zipping our application. The upload will start, and we wait for it to turn green, even if it’s sometimes blue at 100%; wait for it to be green.

Here, we have indicated that you should confirm that the file is uploaded to the public_html folder and that it is green, as mentioned.
- The next step is to unzip our application. Close that tab, click Reload in the File Manager, and our uploaded file will appear in the public_html folder.

Now we will see all the files, but some files are hidden, like the .env file, which is essential. To see these files, do the following.
- In the upper right corner, click on Settings, then check the “Show hidden files” option and save.


Now we should see all our files as in the image below.

The next step is to move ALL the files to the home directory. This is crucial for security reasons, so all the files are not in the public_html folder but in the home directory, and the contents of the public folder will be in the public_html folder. This is a practice used by everyone, so we will do the same in this tutorial.
Another option is to leave everything as it is but then modify/create a .htaccess file when someone opens your site to directly open the public_html folder and the index.php file located there. You can search for the default content of the .htaccess file on the internet.
- Select all the files and click the Move button, then in the field for the location where we send our files, leave only a slash, which means it is the home directory, and then click on Move Files as in the image below.

- Now that we have done that and are left with an empty public_html, open the public folder of our application and go again to select all and move again, and in the location field, enter a slash followed by public_html to send all files to the public_html folder. Like in the image below.

Now that we have done this, we have completed the file setup.
The content of the .htaccess file in the public_html folder of our application is:
<IfModule mod_rewrite.c>
    <IfModule mod_negotiation.c>
        Options -MultiViews -Indexes
    </IfModule>

    RewriteEngine On

    # Handle Authorization Header
    RewriteCond %{HTTP:Authorization} .
    RewriteRule .* - [E=HTTP_AUTHORIZATION:%{HTTP:Authorization}]

    # Redirect Trailing Slashes If Not A Folder...
    RewriteCond %{REQUEST_FILENAME} !-d
    RewriteCond %{REQUEST_URI} (.+)/$
    RewriteRule ^ %1 [L,R=301]

    # Handle Front Controller...
    RewriteCond %{REQUEST_FILENAME} !-d
    RewriteCond %{REQUEST_FILENAME} !-f
    RewriteRule ^ index.php [L]
</IfModule>
But if we go and open the site, we will get an error (in our case, because we are using a database and we haven’t set it up yet).
The image of our error is shown below.

Creating a database, database username, and password and setting it up in our .env file
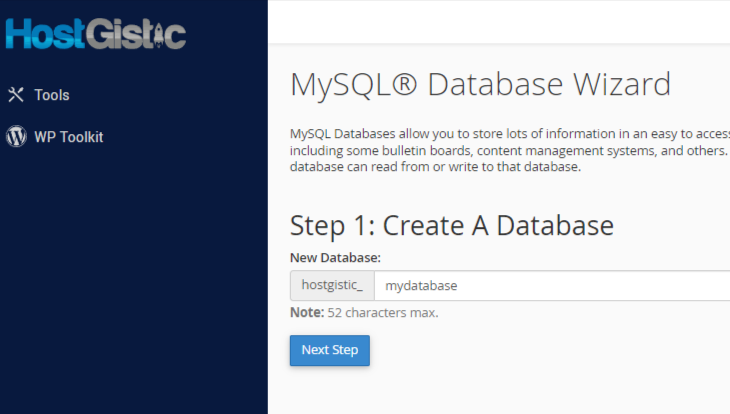
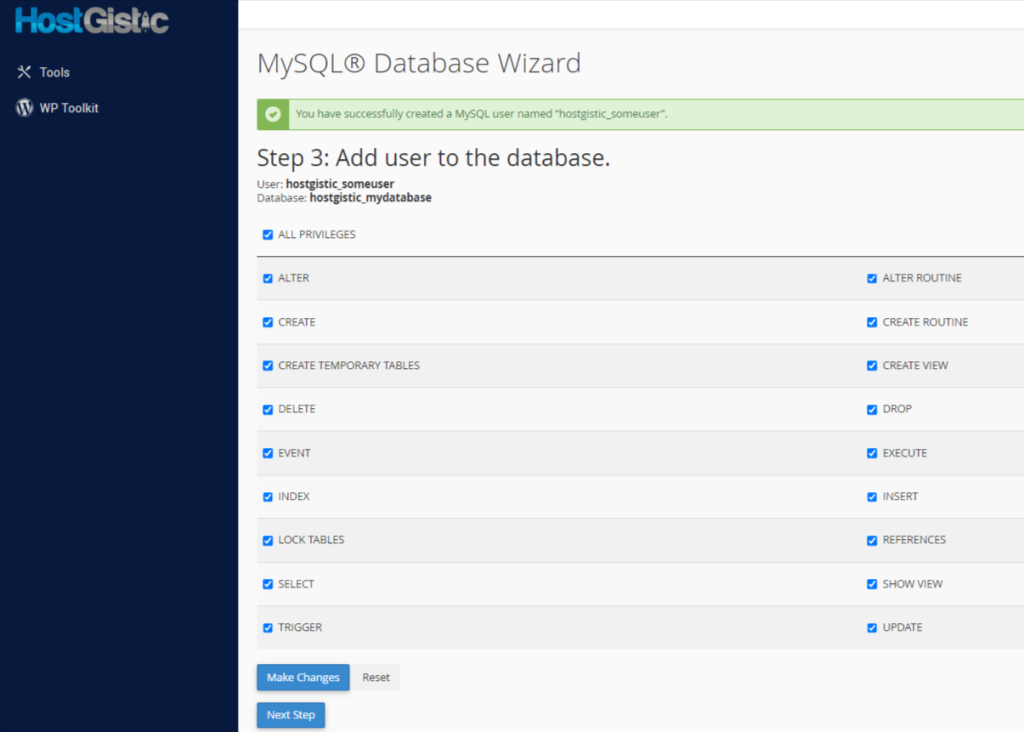
- In cPanel, find the option called MySQL Database Wizard, which will help us create and set up in 3 steps. The following 3 images are those three steps.

- First step: creating the database.

- Second step: creating the database username and password for that user.

- Third step: setting the user’s permissions for the database. Check all.

We have completed that part. Now it is necessary to save this information in the .env file to connect our application to the database.
- Go to cPanel, then File Manager, and in the home directory, you will find our .env file. Right-click and then edit. (if an encoding option appears, just confirm).
- You need to change the APP_URL to your domain URL, DB_DATABASE, DB_USERNAME, DB_PASSWORD, and set it up with the data you created the database with following the instructions above. If you don’t remember this information and haven’t saved it, you can view it and set a new password in cPanel under MySQL Databases.

Now we need to export the database from our computer and import it into our hosting. If we don’t want to do this, Laravel has a great command for this if we have done everything correctly, which is:
php artisan migrate --seed If you didn’t work this way, you will need the following for exporting and importing the database.
- First, go to localhost/phpmyadmin/ and select our database on the left side and click on export, then click on Go in the lower right corner.

- Now go to cPanel and select the phpMyAdmin option.
- Again, on the left side, select our database, but this time go to import.

After the import, you should receive a green message: “Import has been successfully finished,…”
Now, when we open our application, it will open correctly.

If something still doesn’t work and you get a 500 error, it means there is an error in the code.
500 error debug file
You need to enable Debug in the .env file at the beginning of the file, and then your error log is located in storage/logs/laravel.log. By reviewing that file, you will see what error is in question and what the problem is.


